 I was tired of throwing away perfectly good rotting food, so I decided tobuild a compost tumbler. After some studious internet researching, I found two main types or classifications if you will, of compost containers: Big and li'l. Or, rather, a stationary structure whose kitchen, garden, and yardwaste compost must be turned with a pitchfork or otherwise shovel-like device, a.k.a. Big; or a drum-esque contraption that may be turned round in circleys and is size enough just for kitchen rottens and pickin' up, a.k.a li'l. I have got to move away from the South.
Since I don't yet have a garden (oh forgive me for not having a flourishing oasis of food a month after I moved State), though I did manage to keep the herbs mostly alive (sorry, Cilantro), I thought I'd start li'l. Also, I don't yet have a pitchfork. Also, I don't want to have to walk allllllll the way to the back of the house only to then have to wield a pitchfork.
Of the smaller composters available for re-creation from internet pictures, there are two types: the kind with an axel, and the kind on casters (small wheels). As my mother pointed out, to

build the kind with the axel was more costly, more time-consuming, and more complex, and also I had spare casters lying around from a broken under-the-bed drawer that I refused throw away without scrapping for parts that I might but, as my boyfriend pointed out, probably wouldn't ever use (ha!).

So, with the help of other people's blogs, I decided to chronicle my own adventures (like drilling into my pants) in building a composter. I try to be as detailed as possible with all the information that would have been very helpful for building my own and maybe I can prevent just one person from drilling into her leg.
METHOD:
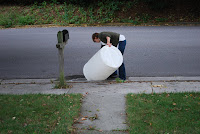
Step 1: Go back in time about a week to your local carwash to obtain an empty 55-gallon drum. They will tell you that one will be empty in about a week. This simple time travel will save you from a week of impatient agony, which I endured for all of us. In whatever meantime you do incur, you'll need to gather supplies and plan your design.

If you already know how to build things then I don't know why you have continued to read this far, so go do it yourself. But if you have a sometimes cripplingly basic knowledge of buildin' stuff, my instructions are for YOU. You can change whatever you'd like about sizes, colors, styles, types, and you may have to if you don't have the tools I used (saw, drill, socket wrench, fingers, pencil, tape measure, staple gun). Here is what I used.
INGREDIENTS:
- 1- 55-gallon drum
- 2- pressure treated 2x4s, 12 feet long each (if you have the time/$ to protect the wood in a more natural way, please do)

- 1-2 cans Rustoleum Black Heat Resistant BBQ Grill Spray Paint

- 4- casters (preferably larger than mine, non-swivel)
- 8- hex bolts (1/4" x 3 1/2")
- 8- matching nuts
- 20 matching small washers
- 8- hex cap lag screws (3" long) (pointy end) OR 16- 2" screws

- ~12- 1/8" x ~1 1/2" nuts & bolts and ~12 matching small washers
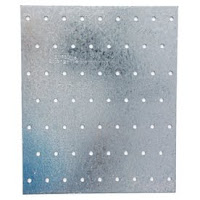
- 3- "fins" (I used bent-in-half-lengthwise wood-to-wood tie plates: 7"x5 3/4") If you want to spend the extra $, I would use the playground frame brackets in the link below
 http://images.lowes.com/product/converted/032866/032866446715lg.jpg
- Swivel hasp (pictured) or some sort of latch

- Hinges or some vinyl screen and scrap wood trim
- Earplugs
- Safety glasses
- Loaded staple gun (if making your own hinge)
DIRECTIONS (cont.):
Step 2: Wash out your drum thoroughly. I used washing soda and recommend something like that or baking soda.

Step 3:
Put in your earplugs and put on your safety glasses.


Cut your second 2'x4' into 4- 24" lengths and 4- 12" lengths, using the first cut to measure the other three.


Run out of battery two millimeters from your last cut.
Step 4: Draw your square for your opening in your barrel. Make it whatever size will be convenient for loading but sturdy, and mind the thicker parts, or better yet, incorporate them into the structural integrity of the door. Somewhere around 12" x 12" and draw until it's right because you only get one cut. Don't worry about the markings, you'll be spray painting over them later.
Step 5: Drill ~1/4" holes all over your drum for aeration, about every 8 inches, avoiding the door and the area around the door where you'll be mounting hinges. The space between the door and the drum body will provide aeration. This will make a mess of curly-cue plastic spirals, so be sure to do it on your boyfriend's side of the bed.
Step 6: Cut: While straddling your drum, just dip your circular saw into the line holding back the safety guard, and finish the corners with a serrated knife.
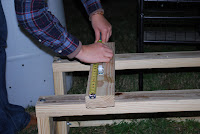
Step 7: Build your frame.


The pictures should show you how to structure your base. Use a 1/4" drill bit to make holes for your hex bolts, and use a larger one (the size of your washers) to countersink about 1/4" deep.

Use washers on both ends.

Use either the Lag Screws or the 2" screws where you attach to the shorter side of the 2"x4", as opposed to the face and to attach the top beams to the four legs, and do use one washer with each Lag Screw.


Step 8: Attach the two top drum support beams and the casters onto the beams. My casters rest in the scoopy divit under the top of the barrel, with the others about 6 inches from the bottom end of the barrel. Be sure the casters are clear of the hatch (door). How far apart your casters are will depend on their size and the size of the drum, so just screw one in and adjust the other until you get a good, sturdy spin.

Step 9: Affix the "fins" onto the inside of the drum in places where they will best churn the compost (like the fins on the inside of a clothes dryer).

Do this by lining them up where you want them to go and drilling 1/8" pilot holes from the inside of the drum. This is where you do NOT drill into your leg. Then attach the fins with at least 3 bolts going into the drum (not out of, like the direction in which you drilled).
Step 10: Attach the hatch (door) to the body of the drum using hinges or a homemade hinge. To make a hinge, take two strips of wood trim (~1" wide x 1/4" thick x ~three inches bigger than your hatch top opening) and staple the top of your screen across one of the strips of trim. Roll the screen tightly around it a few times and staple again. Now lay the 2nd piece of trim on top of the first and wrap screen on top of it snugly. This position simulates a fully opened hinge and shows you how much screen you will need in between your two pieces. You will have to manage to wrap the screen around the 2nd piece and leave just that same amount in between the two pieces of trim (which are wrapped a few times and stapled to the screen). Now attach the bottom piece of trim (all wrapped in screen) to the top of your hatch (door) by drilling 1/8" pilot holes and using the 1/8" nuts and bolts and a washer over the screen. Do this in 3 places - about 1 inch from each side and one in the middle. Now line up the hatch with the hole in the drum and attach the top piece of trim (all wrapped in screen) to the drum just above the hole. Do this again with pilot holes and bolts & nuts & washers, but do it in 4 places - about 1 inch from each side and two centered in between. I didn't take any pictures of this process because I didn't know what I was doing but you can get an idea from the finished pictures.

Step 11: Spray paint the whole drum. It is important that you use a heat-resistant matte black paint so that the compost can get good and hot (and "cook") and when it does, the paint won't chip off. You can paint the base however you'd like, but I think it looks less un-classy in wood-color.


Step 12: Affix swivel hasp. Do this by centering the swivel part just below the hatch opening and affixing it with bolts & nuts (not the sharp screws with which it comes). Then align the hinged latch part, latch it with room for it to slide open and closed with the lid and affix it on the lower part of the hatch door, in a position where the swivel can be turned (with a bit of finessing) to lock the hatch.

Step 13: Put the drum on the stand. Done.
DISCUSSION:
From typing up this instructional-type blog, I've learned two things. First, this particular blog is backwards, not user-friendly, and I would have probably saved a lot of time by printing out the pictures or even drawing them, cutting and pasting them onto a sheet of paper, typing or even writing out the text and then scanning it all onto my computer and uploading it page by page. But I don't have a scanner. Maybe Woot will have a deal on pitchforks and scanners this week. Second...ly, the next time I build something, I will chronicle it as I go - straight from hands to blog. Trying to remember all the steps and details based solely on memory and pictures taken only during the first half of the project makes me wonder what I've left out.... Consider that my disclaimer.
I hope this modest chronicle will help you design and create your own compost tumbler and perhaps break down some walls of anxiety about trying things that you've never before done and creating something that's just as good, nay better than store-bought.